The first graders and I compared actual Navajo blankets to the Navajo Cylinder series. Students cut the top half of the water bottle off, and I saved it for the 4th grade "ikebana" flower forms. Then we coated the bottom half of the water bottles with a mixture of black tempera, acrylic medium and some glitter for shine. The next session, we dipped pieces of string into starch, and draped them across the water bottles to create line designs. In order to stop the water bottles from rolling, I gave students a small ball of modeling clay, which they divided into 2 pieces, and wedged underneath the sides of the water bottle when they laid it down. I had started by giving each student a manila paper as a placemat. This served as a way to write their name temporarily, along with giving a work surface. After they were dry, I wrote their names on the cylinder with a silver sharpie, and recyled the clay for another session.
Wednesday, September 22, 2010
Chihuly Art Lessons from DuPont Elementary
I began this lesson with my 3rd and 4th graders, but I am thinking about involving the entire school.
We have done several lessons already this year to study Dale Chihuly's art, which is leading up to a field trip to Cheekwood and an installation project in the school library.
Here is a basic overview of my Chihuly unit:

The most challenging things I have run into with this project: Cutting all the jugs, and figuring out how to get them on the pole!
You can visit my blog to find out more about our projects at DuPont, just go to O'Neills Art Room Blog.
We have done several lessons already this year to study Dale Chihuly's art, which is leading up to a field trip to Cheekwood and an installation project in the school library.
Here is a basic overview of my Chihuly unit:
- I began with the Macchia unit that my fellow metro art teachers came up with. We looked at Chihuly's Macchias on his website, and then created our own.

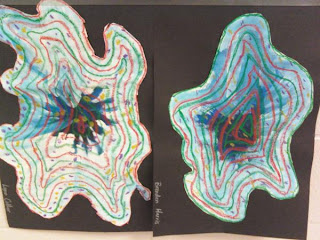
- We also did some Macchia paintings, similiar to Mr. E's lesson. We used tints and shades to paint an organic shape, shades in the middle, tints around the edge (which created a little depth). Then, students used chalk and pastel to add the lines and spots on top of the painting. They looked fabulous! (A little like an Amoeba, but still fabulous!)
- We then moved into looking at Chihulys Ikebana's and Towers. Students sketched designs for their own Ikebana's, and a design for an installation to be put in our library.
- Next, students brought in milk jugs and we cut them into flower petal shapes. The opening of the jug was the center of the flower, and the bottom of the jug was another layer. We put the two parts of the jug together by using a tissue paper flower and pulling it through the center.
- I am currently in the process of creating a tower installation on a pole in our library.
The most challenging things I have run into with this project: Cutting all the jugs, and figuring out how to get them on the pole!
You can visit my blog to find out more about our projects at DuPont, just go to O'Neills Art Room Blog.
Tuesday, September 14, 2010
Painting Lesson from Tulip Grove Elementary - 4th Grade
After watching a video on Chihuly & looking at some images I had from the St. Louis installation we were ready to begin our project. Providing background knowledge to your projects is important for your students to view it as more than just an odd skill their odd teacher is making them do.
My students revisited the idea of our project from last week, and recreated the line drawing that they would eventually paint. I introduced analogous colors & revisited complementary colors. Students then picked out the analogous colors they wanted & received white to tint the image. While they were painting I allowed the Chihuly video to play in the background. After students were finished with their analogous color, they received their complementary color to make a line/ripple design on their image.


